And I have been doing just that!! Amazing!!
I want to mention a few other things in this post as well.
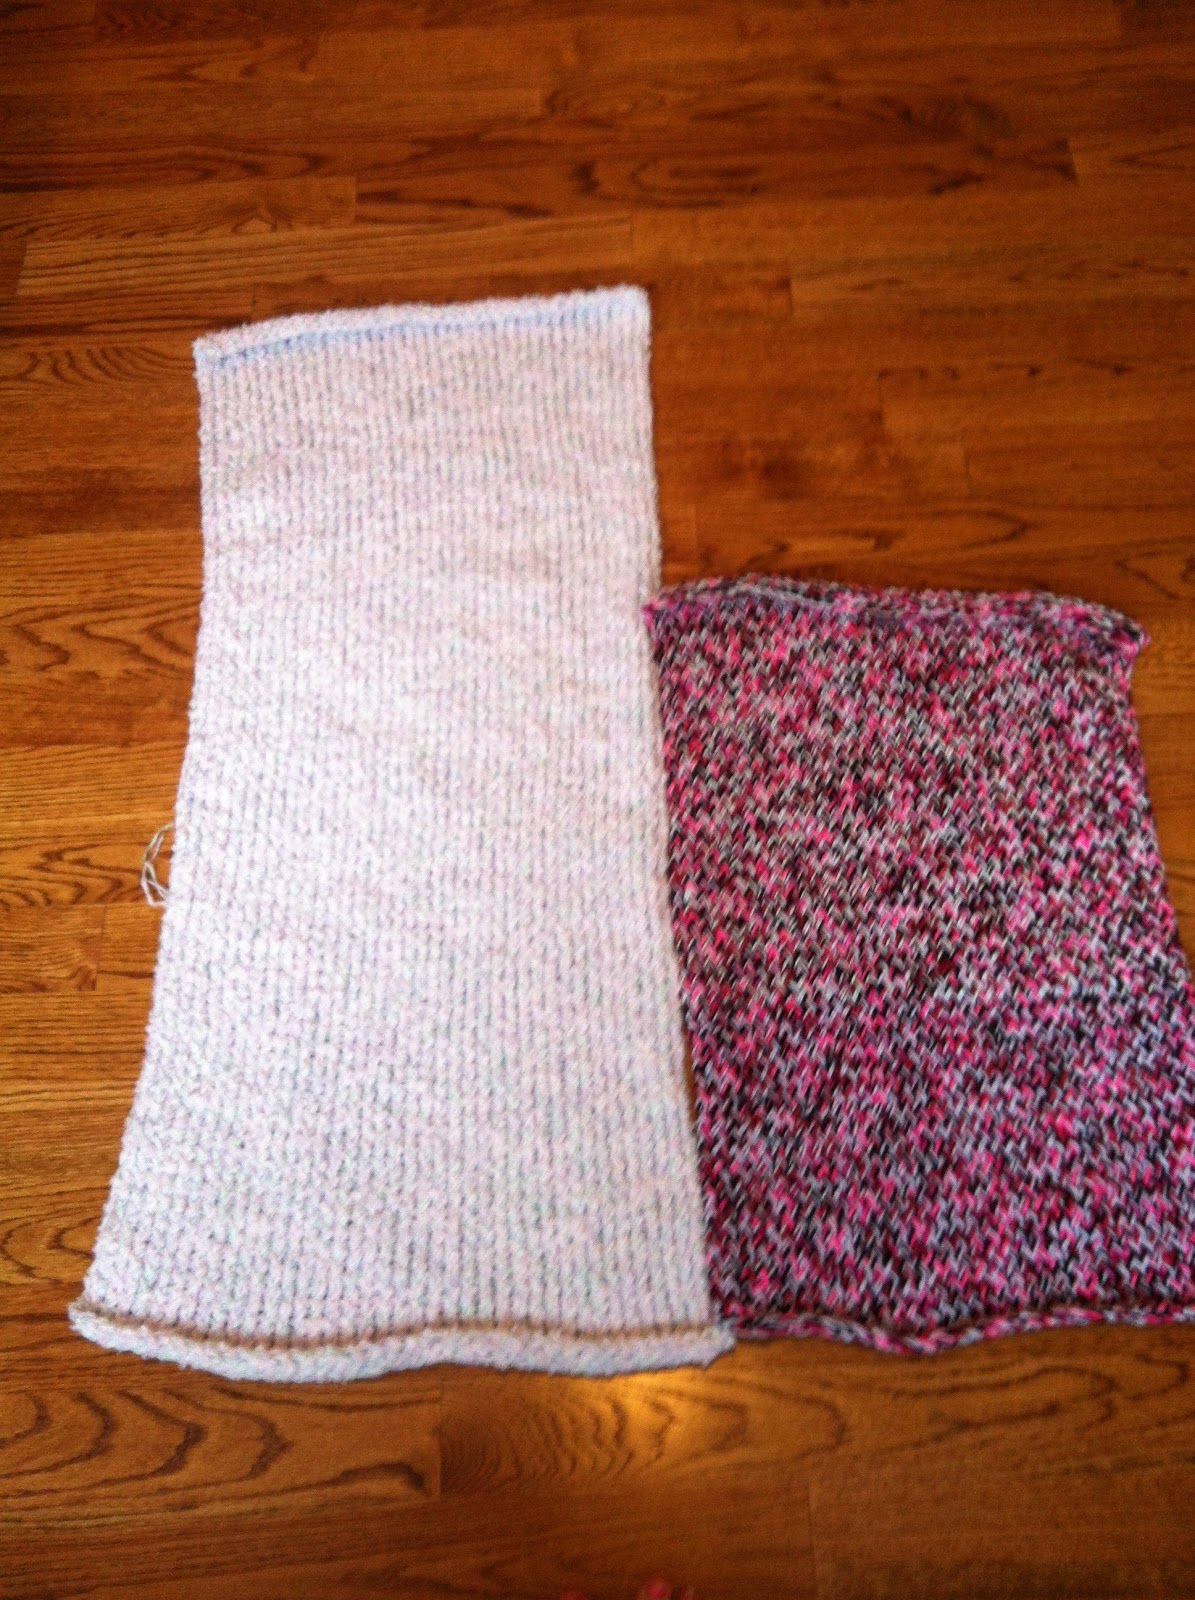
I have a pattern for an infinity scarf!! HOORAY!!
But first, I found this amazing site!!! I am a godmother x3 - I have my godson, and my two goddaughters and I can NEVER find anything during the holidays or birthdays that says or shows godmother -goddaughter/godson status; whether its clothes or cards. This right here has them!!!!!!!!!!! My godson just turned 7(!!!!!) on sunday (4/6) and I got him a shirt and just because I was there I got shirts for my goddaughters tooooo!!!!!!!!!!! I may be going back and purchasing the keychain too. I was so so so so so so so sooooo excited!!!! Here is the link to the site!!!!
I have also gotten into this going green phase. composting, reusing items, I've reused paper towels, rinsed them, let them dry and used them again, saving things, and we got rain last night and late last week too and I used the rain water to water my indoor plants rather than from the tap. Little things - but I have noticed that my families trash can now fills up about once per week rather than 3-4 times per week. I even started a loom knitting project with plarn!!!! I'll post that pattern once I have completed the project but if anyone wants to try it out this shop here has plarn already done up - it ships to you and you just start your project like you would start with yarn. I found it saves the hassle of sitting there from hours on end trying to make it yourself. Plus, I purchased from a few different places just to see - this shop's has been sturdier and held up a lot better - its also what is known as double ply in the plarn world - so its double stranded. The other ones I bought - I purchased from I believe 8 different places - 6 were only a single strand, and the only other one that was double ply was thinner strips and I felt like I was retying pieces together every ten minutes or so. If you find a different shop that has a good quality as well just let me know and I can add it to the list :D
So those were the other two things I wanted to let everyone in on. Below is the pattern for the infinity cowl/scarf. It is a stripped multicolor cowl/scarf so you will want 3-4 different colors to create the look. My sister has my finished one down at school with her, and I unfortunately don't have any pictures of it. I have started a new one and will upload pictures as it gets bigger
Items needed:
2-3 pairs of circular needles (all the same size)
1-2 DPN's (double pointed needles) (same size as circular)
1-2 skeins of each color (same brand and coordinating colors work best)
Needle tip covers (optional)
((Side note: Your can use almost any stitch for this pattern. If you have a favorite you can use it. I just stuck with a knit stitch, I love the flat look it makes especially with the stripes. ALSO I found my Knit Picks Interchangeable Needle set worked amazing for this)
To start:
On circular needles; cast on the number of stiches you wish to create the desired finished length. You can start with any of your colors, just be sure to write down the order you with to use them in. I will be referring to them as "Color A", "Color B", "Color C", and "Color D".
Your are going to begin back at the beginning where you began to cast on. If you are using 3 colors, you are going to want to slide (CAREFULLY!) 20 stitches onto a double pointed needle (DPN). If you are using 4 colors, your are going to want to slide 30 stitches onto a DPN.
Make a loop like you are going to cast on with "Color B". Using another pair of circular needles, knit in your desired stitch across until the end - you should have two live ends of yarn on that end.
Once again you are going to begin back at the beginning. Slide ten stitches back onto the beginning of the circular needles. Leaving your last ten if you are using 3 colors, and 20 if you are using 4 colors.
Make a loop like you are going to cast on with "Color C". Again using another pair of circular needles, knit in your desired stitch across until the end - you should now have 3 live ends of yarn on that end.
((For those only using three colors scroll down to **CONTINUE**))
Once again you are going to being back at the beginning. Slide ten stitches back onto the beginning of the circular needles. Leaving your last ten on DPN.
Make a loop like you are going to cast on with "Color D". Again using another pair of circular needles, knit in your desired stitch across until the end - you should now have 4 live ends of yarn on that end.
**CONTINUE**
So you have used all your colors but still have ten unknit cast on stitches on your needles?? PERFECT! This is what you want.
Make sure that your word is facing the same direction at both ends of the circular needles, making sure that no twist managed to sneak in.
YOU CAN NOW JOIN IN THE ROUND!!!
The first few rows while easy it takes some getting used to. Using "Color A" knit those ten cast on stitches.
Done? Ok now keep going until you have reached the rest of the yarn! Drop "Color A" and pick up "Color B" and knit the circle.
Drop "Color B" and pick up "Color C" and knit in a circle. You want to be sure that you don't twist the yarn when picking it up the back of your work does begin to look like a continuous knit. ( I found different tote bags for each color worked)
Using four colors?? Drop "Color C" and pick up "Color D"
Continue until you have your desired width. I staggered the ending of each one.
Using "Color A" knit around and begin your cast off at 20 stitches left.
Using "Color B" knit around and begin your cast off at 20 stitches left. Cast of "Color C" entirely if your using only three colors.
Four colors??
Using "Color C" knit around and begin your cast off at 20 stitches left.
Cast off "Color D" entirely.
Hopefully this makes sense. If you have any questions feel free to ask. :D
Showing posts with label circular. Show all posts
Showing posts with label circular. Show all posts
Tuesday, April 8, 2014
Monday, November 5, 2012
Hurricane Sandy knitting frenzy
We survived. Barely. The family I work for got SUPER lucky, there was a tree bending towards the house, and I would have put money that if it came down that they would have lost the master suite, garage, parents closets, half the kitchen, and my car. It ended up coming crashing down, but went AWAY from the house. We lost power on monday afternoon, and got it back on thursday, thankfully the family has a generator and were able to poorly hook it up to the fridge, tv, cable box, and water. During the week since the kids didn't have school and were absorbed in their electronic games ( I tried to teach them card games but those were referred to as "boring") I was able to knit a pair of fingerless gloves on DPN's. I just knitted in a circle without a pattern, made a spot for my thumbs and VOILA! I do have a note to self to use a pattern next time. I was also able to finish my sisters hooded scarf BUT as promised I did take a video to help explain the pattern and hood cast on. I have never uploaded a video before and I hope I do this right.
Here is how to put the scarf onto the round loom:
Here is how to put the scarf onto the round loom:
And here is how to wrap the pegs inbetween:
I hope this helps. If there are any questions please ask, I want to make sure I explained everything right.
Thursday, October 11, 2012
Way too early morning...
Etienne had to be at school this morning for a class trip to Boston, at 5:15am. UGH 5am this morning was not fun. Soooo when I got back I did some more knitting on the project I'm working on for my best friend, with as well as its going I could have it done before she leaves in a few weeks and MAYBE Ill get mine done before the white out game. Only time will tell. I only have to do about another two feet of knitting before the scarf part is done then I can attach it to the round loom and work up the hood. I'm excited for her to see the finished project. Here's the top view on the loom and a closer look at the yarn Mary picked out. I think they look great blended together.


Once these next two are done I can't work on the one for my sister for her Christmas present. She picked white to be paired with gold and purple. She attends James Madison University, so I picked gold and purple as the base and allowed her to pick a neutral, out of white, beige, tan, grey, or black.
More to come, Happy knitting
Wednesday, October 10, 2012
Help Patpat's Hats
I did a little bit of knitting last night and need to find a better way to knit on the straight loom. If I hold it parallel to my body it comes out nice but goes SOOO slow. If I hold it perpendicular, it gets a wavy look to it and I don't think it looks good. If anyone has any suggestion I'm open to trying something new. I haven't been able to make a hat in a month or two and I feel like I haven't done anything to help (I have a pile of them that I need to send in) out with PatPat's Hats.
Anyone looking for something to knit and would like to help children in the hospital battling cancer; check out PatPat's Hats. Click here to go to their facebook page, or here to visit their webpage. They are just over a year old and have received hats to equal out to at least one for each day of their existence, if not two. While they have received a lot of hats, there are more children with cancer than we think, and more unfortunately being diagnosed each day.
Patrick (affectionately known as PatPat) was diagnosed with cancer at age 2, only a few months before he turned 3. His Aunt Betsy is a very avid knitter and made him quite a few hats while he was in the hospital to keep his head warm while he received chemotherapy. This was when Aunt Betsy got the idea for PatPat's Hats. They accept new, unused, handmade, knit, crocheted, or store bought hats for preemies, infants, toddlers, children, preteens, and teens. They donate them to the local cancer treatment centers to hand out the hats to patients.
While Pat may not be immediately related to me (He is my mom's brother, Keith's wife, Debbie's sister, Katie's daughter, Becca's son) he is still my little cousin. Keith and Debbie invite both family sides when they host holiday parties or celebrations. I have grown up referring to Debbie's sibling as my aunt's and uncles, her niece's and nephews as my cousins, we are one big, integrated family.
Every hat helps.
Happy knitting!
Tuesday, October 9, 2012
Afghan photos
I Figured out how to upload pictures!! My day today is being spent doing scholarship applications so no knitting will be done until tonight after dinner. I did get another 3-4 inches done over the weekend while Allen was setting up his Wii that he hasn't used in the longest time.
The first picture is a close up of the second panel made up of 4 strands of yarn. The second picture is of the two panels side by side. The other panel is the first one I made, and is made up of 3 strands of yarn. Both very thick and super warm already. I can't wait for it to be done so I don't freeze this winter, if its as bad as the one we had in 2010.

Thursday, October 4, 2012
Hooded Infinity Scarf
I started a project a while ago on needles and it didn't turn out like I expected. It works, I'll wear it, but the "scarf" part isn't as long as I wanted. So instead I came up with a better idea. Use my loom!!!
I'm still working with the pattern and working out the kinks.
Supplies:
-1 short loom (I used the pink Provo Craft Knifty Knitter)
-1 extra large circular loom loom (I used the yellow Provo Craft Kifty Knitter)
-1 loom knitting hook
- Approx. 4-6 skeins of yarn (I used three strands for this project and used 6 skeins)
-1 yarn needle
Directions (Scarf):
Cast onto your short loom using the cross rib (figure 8) stitch. Here's how if your unsure and go straight to the 3:00 minute mark. Continue with knitting with this stitch until your scarf has reached the desired length.
*I recommend resting the end on a shoulder and wrapping the scarf while on the loom loosely around your neck so that the loom is on the other shoulder and in the same position. You don't want the ends to go to far down your back since they will be attached to the hood. Once you find your desired length, cast off. I did about 5 feet, and can wrap it twice for extra warmth.
Directions (Hood):
Take the scarf and lay it flat one end near you, the other far away. Take the end near you and bring it to the side of the far end making a single twist. Take the ends and place them onto the circular loom, careful not to add any more twist or take out the one that was made. Place them side by side careful to not where one ends and the other starts, you don't want to knit them together as these will be the sides of the hood. (I have found that doing a k1/p1 repeating for the first few rows helps prevent the curling that can happen using circular looms). Start knitting side to side using the E-wrap going back and forth until the hood has reached the desired length. Cast off. To complete the hood turn the purl side out and sew up the cast off seam so that it is on the inside.
Voila! Ready to wear!
(Like I said I'm still working out the kinks, if there is something that isn't understood, please let me know)
Wednesday, October 3, 2012
Afghan: work in progress
I have lots of left over yarn. Scrap pieces, none long enough for a single project alone. My solution?? Patchwork quilt!! Sort of. I've been wanting to make a nice quilt to cuddle up under on the couch. We have a few blankets at the house but nothing special and nothing that keeps you warm without doubling it over.
I used the extra large yellow round loom from Provo Craft and made flat panels. I had a few skeins of yarn that I had gotten for projects that I never got to and can no longer remember what I was going to make. Currently I have two good sized panels and have sew them together; side by side. While not the same size they were making me sweat while I made them. One is with 3 strands of yarn, the other with 4. Both the same thickness. I have a few pictures and am still trying to figure out how to upload them. I may add them to the next update if I can figure it out.
I used the extra large yellow round loom from Provo Craft and made flat panels. I had a few skeins of yarn that I had gotten for projects that I never got to and can no longer remember what I was going to make. Currently I have two good sized panels and have sew them together; side by side. While not the same size they were making me sweat while I made them. One is with 3 strands of yarn, the other with 4. Both the same thickness. I have a few pictures and am still trying to figure out how to upload them. I may add them to the next update if I can figure it out.
Subscribe to:
Posts (Atom)